
Olarm allows you to control your current alarm system from your phone, anywhere in the world. This article explains how to install the Olarm Pro (4G) hardware into your existing alarm panel.
The Olarm App is very user-friendly allowing you to arm/disarm the system, bypass zones, and check the status and history of your alarm system.
To make use of Olarm, you will need to purchase the Olarm Pro (4G) hardware (once-off cost) and choose one of the following subscription packages:
6 Months subscription: R 349
1 Year subscription: R 649 (save 7%)
2 Year subscription: R 1 099 (save 21%)
The subscription covers the data costs of the two SIM cards, which are built into the Olarm device. The subscription package is purchased directly from Olarm via the App.
Please see the steps below on how to set up your Olarm.
Step 1 – Find your alarm panel
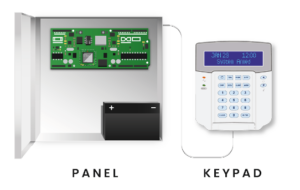
Please note that the alarm panel is not the keypad. The alarm panel is normally a metal box often hidden in a cupboard or an “out of the way” location.
Step 2 – Open your Olarm PRO (4G) box

Included in the box is the following:
1x Olarm PRO (4G) device
1x Connector cable
2x Screws & wall plugs
1x Drill hole template & LED colour legend.
Step 3 – Download the Olarm app & register your device
![]()
Tap on your App store on your phone and search for ‘Olarm’. Download the App and follow the steps to register.
Step 4 – Turn off your alarm panel
First disconnect the black back-up battery (normally the size of a brick) found in the panel, then pull out the wall plug from your electrical wall socket (power source).
Step 5 – Connect the connector cable
Olarm supports a variety of alarm panel brands and models including Paradox, DSC, IDS and Texecom. Please read below about how to connect the Olarm to the various panels.
PARADOX
Plug the 4-pin side of the connector cable into the port marked ‘SERIAL’ on the alarm panel and connect the 5-pin side of the connector cable to the port marked ‘PARADOX’ on the Olarm PRO.
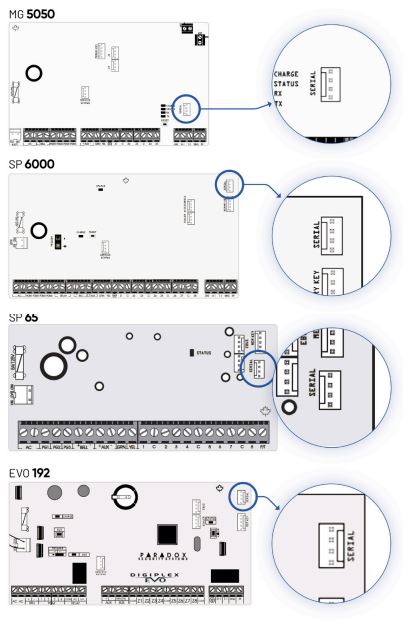
Please note: For Paradox EVO 192 panels with firmware version 7.5 and above, – the serial ports may be locked to third-party devices and will need to be unlocked. Please contact your supplier for more information.
DSC
Cut the 5-pin side of the connector cable and strip the wires so that you can insert them into the alarm panel terminals.
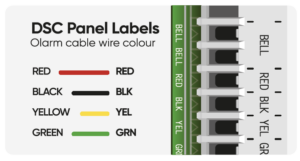
Wire the stripped end of the connector cable into the alarm panel as shown in the photo and connect the 4-pin side of the connector cable to the port labeled ‘UNIVERSAL’ on the Olarm PRO.
TEXECOM
Before you power down the Texecom panel, enter the commands below on the Texecom keypad to allow the alarm panel and Olarm PRO to communicate with each other.
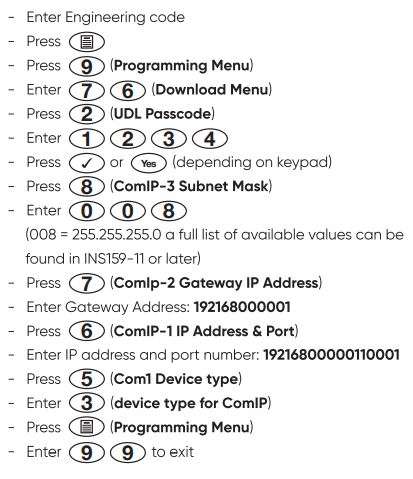
Please note: If Com1 is in use, configure Com2 by entering [9] (Com2 device type) followed by entering [3]. This step should be done after the IP address and port number has been entered.
Then power down the Texecom panel (see step 4).
Plug the 5-pin side of the connector cable into the port marked ‘COM1’ on the alarm panel and connect the 4-pin side of the connector cable to the port marked ‘UNIVERSAL’ on the Olarm PRO. Note: If Com1 is in use, plug into Com2.
IDS
Please click on the links for the set-up manual for the IDS 806 and IDS X-Series.
Step 6 – Power up the alarm panel
Power up your alarm panel by reconnecting the battery and plugging the transformer back into the power source. The Olarm PRO should light up as per the next step.
Step 7 – Check your Olarm PRO’s status
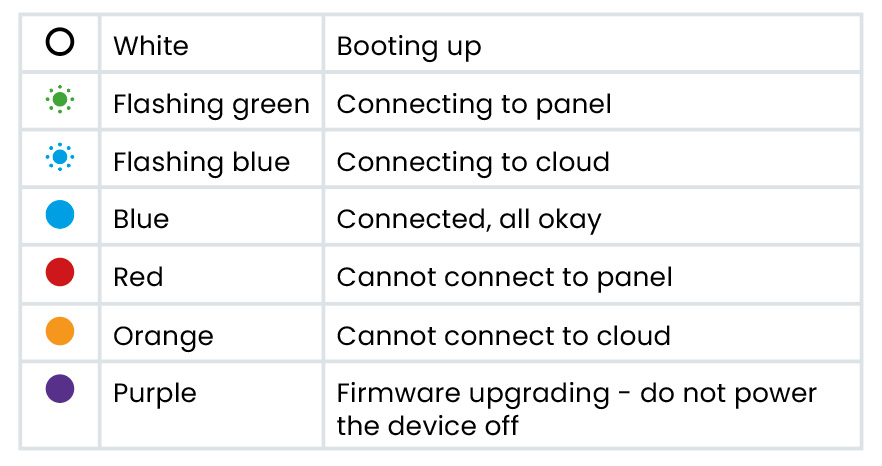
If your device LED remains flashing green for more than 3 minutes – please check the connection between the Olarm PRO and the alarm panel.
If your device LED is red – please check the connection between the Olarm PRO and the alarm panel.
If your device LED is orange – please ensure that the Olarm PRO is located in an area with good mobile signal strength and away from any metal enclosures that could be interfering with the signal.
If your device LED is not coming on – please check the connection between the Olarm PRO and the alarm panel and that the alarm panel is connected to power.
If your device LED remains purple for more than 15 minutes – please contact Olarm Support on
+27 21 009 0911 or email [email protected]
Step 8 – Mount the Olarm PRO
Use the screws and drill template provided to mount the Olarm device.
It is recommended to mount the device on a wall or on the outside of the alarm panel box. Do not mount the device inside the alarm panel or near the alarm radio, as this will decrease signal strength and may cause the device to operate incorrectly.
Step 9 – Connect to WiFi
To connect the Olarm device to your WiFi, please follow the guide on the App. Please note, the Olarm PRO (4G) first needs to have an active GSM/SIM connection to set up WiFi. The Olarm PRO only supports 2.4GHz WiFi.
Click to HERE see the full OLARM product range.